
This article will guide you through the process of a photoshoot. These are the steps to take: Locations, Preparation and Equipment. Here are some important things to remember in order to make your photoshoot a success. Before you begin to shoot, you need some ideas. Start by deciding which locations you want to shoot.
Ideas for a photoshoot
If you're planning a photoshoot for your family, here are a few ideas for the shoot. Recreate some photos from your childhood. This can be accomplished by either finding clothes that match your memories or adding relatives who are from your childhood photographs. You can also make photos look older by using textures. Landscape photography is another option for a photoshoot. These photos can be great fun and often look more interesting than standard images.
Another great idea for a photoshoot is to be focused on perspective. A boring location might seem boring but you'll find the unique details that make it interesting. For the best photos, you can try shooting from the hip and low down. Once you have taken several photos of each perspective, move to the next location. Minimalist photography has led to some beautiful photographs, and it will help you make your photos look better.
Preparation
Preparing for a photo shoot is easy. It is important that you are familiar with the area and prepared for all weather conditions. Before you leave for the shoot, make sure to check the weather to know what to expect. It is important to arrive on time at the location. This will give you plenty of time for setup. Remember to bring water and snacks.
Take reference photos. These photos can be used as a guide when you are posing for your shoot. This will help you create the look you want. It is important to have your hair and make-up in perfect condition before you go on a photoshoot. A photo of you in the outfits is a great idea. Make sure you keep the tags. This will make sure that your outfits look great.
Equipment
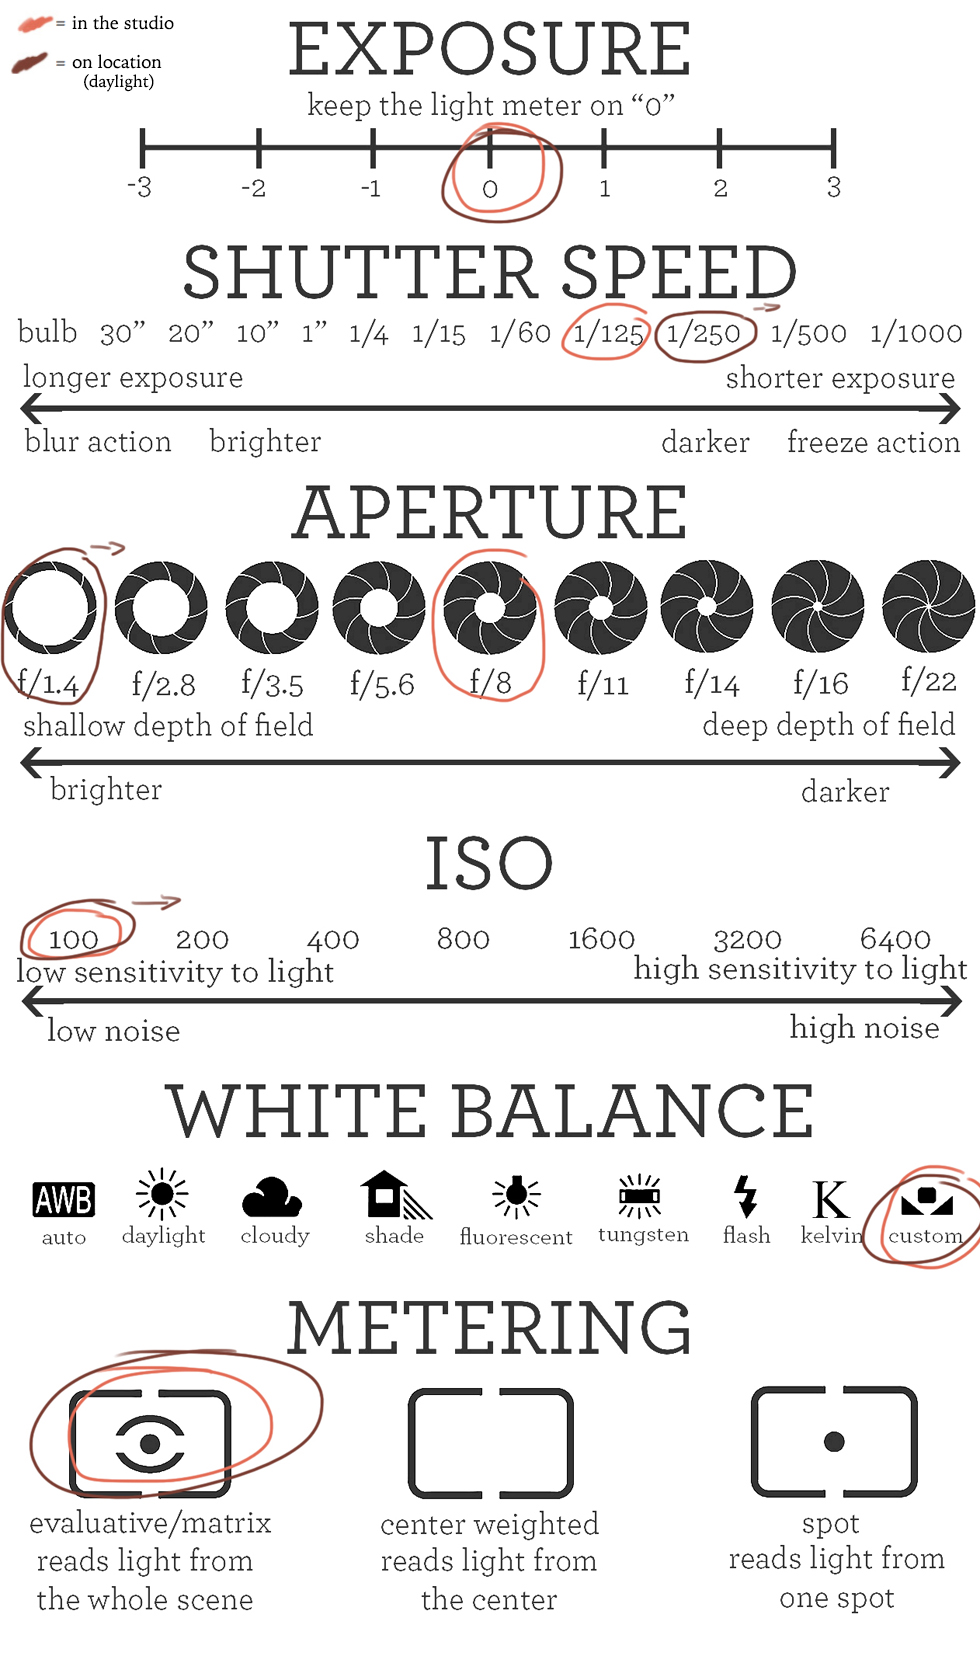
When working with natural lighting, it is crucial to have the right equipment. The color of light varies wildly depending on the lighting conditions, and it is imperative that the image you take is consistent. You will need several pieces of equipment in order to achieve the correct white balance. A color-checker is one of the most important tools. These compact, portable devices can easily be placed inside the scene to help achieve the desired white balanced. They are essential tools every professional photographer should possess.
Apart from a camera, you will also need a prime lens for the project. The best prime lens for this project is a 35mm or 55mm lens. For your tripod, you may need an extension arm and a tripod. Lighting equipment may be necessary for your photo shoot. Depending on your subject, you might also need a backdrop and/or a faux countertop. To get the best results, prepare your equipment in advance.
Locations
When selecting a location for your photoshoot, it is important to consider the logistics of the area, from whether it has outdoor space and easy access. You will need permits to use your equipment in public places. This creates a problem for residents. In order to avoid any problems, it is a good idea to contact your local municipality and check if you can shoot there. This will help you avoid awkward situations later.
The location for a photo shoot can be either a home or a studio. Location houses are privately owned homes that can be hired for a single day or a series of days. These houses are perfect for corporate shoots and have unique features that set them apart from other locations. Brands hire them for editorials, corporate events, advertising campaigns, online content and magazine editorials. These houses can be rented to the general public.
FAQ
How can I improve my smartphone's photography skills?
Great photos don't require expensive equipment! You can take amazing photos with just a phone.
All you need to do is to be able to use the features of the program and to master some basic techniques.
There are many apps to help you edit and share your photos on both Android and iOS.
Here are five tips for taking better pictures.
-
Set Up Your Camera App. Your camera app should come pre-installed on your device. If your camera app isn't installed on your device, download it from Google Play.
-
Use Effects & Filters. Effects and filters allow you to alter the appearance of your photos without needing to touch them.
-
Adjust Exposure. Adjusting exposure helps you control the brightness of your picture.
-
Shoot In The Right Light. Shooting in bright light makes it easier to see details in your subject. You can capture highlights and shadows in low-light conditions.
-
Take Pictures of People. Taking pictures of people shows others the things you love most.
Learn more about taking better photos with your smartphone by reading our article 5 Tips to Improve Your Photography Skills.
Cameras for Sale
There are lots of places online where you can buy cameras. We recommend purchasing from a trusted retailer such as B&H Photo Video. They have knowledgeable staff that can help answer any questions you may have.
B&H ships quickly and securely to make it easy for you to get your order to your door.
This video will explain how to shop for cameras.
Do I Need A Tripod?
This is a question everyone asks. Although a tripod might not always be needed, they can be useful.
This allows you to keep your camera steady even when taking slow shutter speeds. Tripods can be a huge help when you are shooting landscapes or stationary subjects.
However, using a tripod to photograph moving subjects like people or sports can result in blurriness. How do you decide which situations are best served by a tripod.
A tripod is an essential tool for photographing fast-moving subjects or stationary objects. Examples include:
-
Sports
-
People
-
Landscapes
-
Close-ups
-
Macro shots
Try this test to find out if you really need a tripod. Keep your camera still, and then look through the viewfinder. A tripod is required if there are blurred lines, movement or other issues.
If there isn't blurring you won't notice any benefit from adding a tripod.
Here are some tips for those who do decide to buy a tripod.
-
Make sure your tripod has smooth legs. This will stop unwanted vibrations shaking your camera.
-
You should choose a sturdy tripod. Some tripods are made of plastic, so they may not be as durable. Look for a metal tripod instead.
-
A remote release is a great option. This remote control lets you remotely control your camera. You can set it to fire the shutter once you press the button automatically.
-
You should look for a tripod with 360 degree rotation. This allows you to place your camera horizontally and vertically.
-
You should keep in mind that tripods don't come cheap. Expect to spend around $100-200. But, you will get a lot for your buck.
-
Accessories such as filters and memory cards should be considered.
-
Check your local stores before buying online. Many retailers offer shipping free of charge.
-
Review a product to find out what other customers think.
-
Ask your family members and friends to recommend similar products.
-
Forums and message boards are a great place to find out about customer experiences.
-
User reviews can be found online.
-
Amazon.com is a website that allows you to compare prices and get customer feedback.
-
View photo galleries to see the different uses of tripods by photographers.
Statistics
- This article received 13 testimonials, and 100% of readers who voted found it helpful, earning it our reader-approved status. (wikihow.com)
- The second easiest way to get blurry photos 100% of the time is to use a cheap filter on the front of your lens. (photographylife.com)
- That's the easiest way to get blurry photos 100% of the time. (photographylife.com)
- Get 40% off Adobe Creative Cloud(opens in new tab) (creativebloq.com)
External Links
How To
How to Use Lightroom in Photography
Adobe Lightroom can be used by photographers to easily edit photos. It lets you import images from multiple sources into one place, where they can all be viewed, edited and cropped. You can also share them online, print them, or email them.
Lightroom has many editing tools, including cropping, adjusting contrast, brightness, and color balance. Lightroom also offers presets to make common effects like vignette, lens distortion, and black and white conversion. This is the best thing about Lightroom: these adjustments are automatically applied when you export your images.
Adobe Bridge allows you to access Lightroom. This lets you view thumbnails and organize your files while browsing through your collection. You can also add keywords to images to make them easier to find later.
Start with the free Lightroom version if you are new to Lightroom. This will give you the most basic features. You have two options if you wish to upgrade: either buy the full version or subscribe.
Lightroom can downloaded in many ways. Adobe can be purchased directly. You can also download the trial edition and convert it into a purchased license. Here's how it works.
-
Lightroom Trial Version
-
Start the program. At the bottom, click "Convert license"
-
Enter your payment information and select the type license you wish (permanent, one year)
-
To complete the process, click "Continue".
-
Once you have converted the trial version to a paid license, you can continue using it until the end of the term.