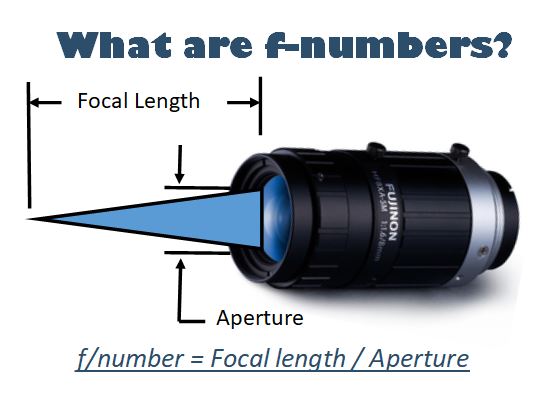
Before you take a photo with your drone, there are many things that you need to remember. It is crucial to learn how to use camera settings like ISO, shutter speed, or aperture to get the best shots. ND filters are also an essential tool to use when taking pictures with a drone. These filters can be used to make your photos more artistic and more interesting.
For drone photography, composition rules
You should adhere to certain composition rules when shooting with a helicopter. For example, if your drone is equipped with a wide angle lens, it's important to avoid any shots that show the spinning blades. You should also ensure that there are no obstructions that might interfere with the signal. For drone control and visibility, strong signals are essential.
A drone can take photos at up to 400 feet above the ground. Taking pictures from this height will help you keep the drone from colliding with any obstacles. You won't have to crop your photos afterwards.
ND filters
If you're shooting footage of a drone, ND filters can help you achieve cinematic-quality images. They adjust the shutter speed to reduce blurring. For best cinematic results, the shutter speed should be set at 1/50 seconds and 25 frames per second.
ND filters serve two purposes. They can be used to increase contrast and color definition and blur the motion. They are very effective for photographing scenes that have moving people or objects such as fireworks. They also provide the drone owner with information on the exposure of their photos.
Stacking filters
Stacking filters is an important step in drone photography. The photographer can get a better shot by using different filters. For instance, an ND filter can smooth out the water on a long exposure, while a CPL filter can minimize reflections from midday sunlight. Stacking filters offer flexibility as well.
ND filters can be used to reduce light in drone photography. They reduce light so that the image looks cinematic. They can also be used to create long exposure shots. These filters reduce the amount light entering the camera lens. They allow videographers a longer shutter speed. Polarizing filters can also be used. These filters darken the sky to make colours pop and enhance their vibrancy. There are many types of ND filters available, so it is important to choose the one that best suits your needs.
Use a composition grid
When creating a composition grid, ensure that you place the right elements. Each frame should be overlapped by 1/3 to create a beautiful composition. A third photo should duplicate the first one. The fourth picture should also mirror the first. Knowing the drone’s Field of View is crucial so you know how far apart your photos should be.
To use the grid turn on the grid screen on your camera and turn the center crosshair. Next, compose a shot. After you have completed your shot, tap the screen again to focus the camera drone. It will take five frames to adjust the focus.
Flying a drone
It is important to keep these things in mind when you fly a drone for drone photography. First, be sure to understand the correct orientation of the camera. This will enable you to achieve the best results. The subject should be photographed with the camera pointed downwards or upwards. This will give the viewer an indication of the subject's scale.
The controls of the drone should be well understood. These controls control how much power your drone has to fly. The drone's throttle controls the amount of power it draws from its motors. You also have controls for yaw that turn the drone counterclockwise. You can move the drone left or right by using its pitch, roll and roll movements. Before you fly a drone, you should go through a pre-flight checklist to avoid any potential risks. The checklist should not take more than a few moments.
FAQ
Should I start photography as a hobby?
Photography is an excellent way to capture memories and share them with friends and family. It also allows you to learn more about the world around you.
There are many resources online that will help you take better photos if you're interested in this topic.
You may also want to consider taking classes at local community colleges or art schools. This will enable you to make connections with other photographers who are able to give valuable feedback.
Do I Need A Tripod?
This is one of those questions that everyone asks. A tripod isn’t always needed, but it can be very useful.
It allows you to hold your camera steady when taking pictures at slow shutter speeds. Tripods can be a huge help when you are shooting landscapes or stationary subjects.
On the other hand, if you're photographing moving subjects such as sports or people, using a tripod can cause blurriness. What are the best ways to determine which situations you need a tripod for?
A tripod can be useful in any situation where you need to capture fast action or stationary subjects. Examples include:
-
Sports
-
People
-
Landscapes
-
Close-ups
-
Macro shots
If you're unsure whether you need a tripod, try this test. Keep your camera still, and then look through the viewfinder. If blurred lines appear or you feel movement, you will definitely need a tripod.
If you don’t see blurring, adding a tripod is unlikely to make any difference.
Here are some tips for those who do decide to buy a tripod.
-
Smooth legs are important for tripods. This helps to prevent vibrations from shaking the camera.
-
A tripod is a good choice. Some tripods are made out of plastic and may not be very durable. You should opt for a steel tripod.
-
You might consider purchasing a remote control. This lets you control your camera remotely. It can automatically fire the shutter when you press the button.
-
Try to find a tripod with a head that rotates 360 degrees. It makes it easy to position your camera horizontally or vertically.
-
Tripods are expensive. Expect to pay $100-200. However, you'll get lots of value for your dollar.
-
Don't forget accessories such as memory cards or filters.
-
Before you buy online, make sure to check your local shops. Many retailers offer free shipping.
-
You can read customer reviews to see what people think of a product.
-
Ask family members and friends who own similar products.
-
Visit forums and message boards to learn about customer experiences.
-
Look online for user reviews.
-
Amazon.com allows you to compare prices, and receive customer feedback.
-
View photo galleries to see the different uses of tripods by photographers.
Light Room is a great way to enhance your photos.
The best way to ensure you have the perfect photos for your project is to start early. It's always a good idea to take as many pictures as possible and then decide which ones will be the most valuable.
Lightroom allows this because it lets you see the effects of different settings on each photo. You can adjust these settings instantly without returning to Photoshop. This allows you quick experimentation to see what looks best and what doesn’t.
How can I look great in photos?
Photographing yourself is the best way to make sure you look professional in your photos. You'll learn how to pose for the camera, what angles are flattering, and which ones aren't. Learn how to use lighting, props and other tools to enhance your natural beauty.
You'll learn how to find clothes that fit and make up that looks great on your skin.
If you're unhappy with the result, we'll show how to retouch your images in Photoshop and other editing programs.
Do yourself a favor and take some self portraits!
Is digital photography hard?
Digital photography can be difficult. Learning how to properly use the tools takes effort and time. You need to know what settings to use for different types of shots. Learning by doing is the best way to learn. Practice makes perfect.
Statistics
- The second easiest way to get blurry photos 100% of the time is to use a cheap filter on the front of your lens. (photographylife.com)
- Get 40% off Adobe Creative Cloud(opens in new tab) (creativebloq.com)
- This article received 13 testimonials, and 100% of readers who voted found it helpful, earning it our reader-approved status. (wikihow.com)
- While I cannot prove that all of those spots were not sensor dust, the photo was taken during a heavy snowstorm…so I guess that 99.8% of the spots are snowflakes. (bhphotovideo.com)
External Links
How To
How to use Lightroom for Photography
Adobe Lightroom allows photographers to edit photos quickly and efficiently. It allows you to import your photos into one place so they can be edited, cropped and lightened. You can also share them online, print them, or email them.
Lightroom offers editing tools such as cropping, adjusting brightness and contrast, color balance and color balance. It also includes presets that allow you to apply common effects like vignette and lens distortion correction. The best part about Lightroom is that you can apply these effects automatically when exporting your image.
Adobe Bridge lets you access Lightroom. It allows you to organize your files and view thumbnails, while browsing your collection. You can even add keywords and phrases to your images so that you can find them later.
Lightroom is free for those who are just starting out. This version includes all the essential features. You have two options when you decide to upgrade. Either you can purchase the full version, or you can subscribe.
Lightroom can be downloaded in many different ways. One option is to purchase the software directly from Adobe. Another option is to download the trial and convert it to a full-featured license. Here's how to do that.
-
Lightroom Trial Version
-
Launch the program. Click "Convert to License" in the bottom right corner.
-
Select the type of license that you would like (permanent or one-year) and then enter your payment details.
-
Click "Continue" to complete the process.
-
After you've converted your trial copy to a licensed version, you can continue to use it until the end.